

I. Introduction
I remember for a long time when I first started learning to program, a project would typically have just one main.cpp file. Everything was crammed into it: global variables, window creation, resource loading, logic processing, and rendering output. While such code could run, as the project’s scale grew and the logic became more complex, it quickly devolved into a maintenance nightmare.
Later, I learned to separate declarations and implementations, so a project would have a main.h and a main.cpp. This resolved the issue in C++ where functions had to be declared in a specific order.
But this still wasn’t enough; it didn’t solve the problems caused by an overly large main.cpp file. You, being clever, probably thought, “Just split it up,” and you’d be right. The project code would then be organized like this:
project/ main.cpp player.h player.cpp enemy.h enemy.cpp utils.h utils.cpp
However, as the project size increased, new problems emerged. The most obvious issue was the huge workload involved in navigating between different sections of the code. This led to the idea of organizing code with folders, which looks something like this:
project/ /core/ /game/ /ui/ /assets/ main.cpp
This is essentially how many large-scale projects are structured today, with the main difference being how the code is grouped. On a side note, I have to complain about the default organization in Visual Studio (not Visual Studio Code). By default, all code is added to one folder, with header and source files placed in separate “Header” and “Source” filters. This makes it difficult to navigate between .h and .cpp files in large projects.
This article will combine the characteristics of C++ projects to share a progressive module organization strategy, helping developers transition smoothly from small projects to large-scale projects with clear modules and a stable structure.
II. Typical Organization in Early-Stage Small Projects
An early-stage small project typically has a single main.cpp file. All functionalities are piled together, with global variables and functions callable from anywhere. The main function directly implements most of the logic. There’s no layering or encapsulation. While simple and direct, as more features are added, this structure leads to:
- Modifications to one feature affecting the entire project
- Difficulty with code reuse and severe coupling
- Challenges with unit testing and collaborative development
As the project grows, the code organization gradually evolves.
III. Fundamental Principles of Modularization (in a C++ Context)
1. High Cohesion, Low Coupling
Each module should have a single responsibility and its internal logic should be tightly connected, minimizing dependencies on other modules. Consider the following code:
C++
class Player {
private:
    float x, y;
    std::string texture;
public:
    Player(float startX, float startY, const std::string& tex)
        : x(startX), y(startY), texture(tex) {}
    void UpdateAndRender(float delta) {
        x += delta;
        // Direct rendering details here
        OpenGLDrawCall(x, y, texture);  // Assume this is a global render function
    }
};
All functionality is mixed into one class, which is responsible for both updating its position and rendering. The class has hard-coded dependencies on specific implementations, leading to coupled logic. This results in confused responsibilities and makes the code difficult to reuse. The refactored code is as follows:
C++
// IRenderer.h - Rendering interface
class IRenderer {
public:
    virtual void DrawSprite(float x, float y, const std::string& texture) = 0;
    virtual ~IRenderer() = default;
};

// SpriteRenderer.h - Specific implementation
#include "IRenderer.h"
class SpriteRenderer : public IRenderer {
public:
    void DrawSprite(float x, float y, const std::string& texture) override {
        // Actual rendering code
    }
};

// Player.h - Player class, only responsible for its own behavior
class Player {
private:
    float x, y;
    std::string texture;
public:
    Player(float startX, float startY, const std::string& tex)
        : x(startX), y(startY), texture(tex) {}
    void Update(float delta) {
        x += delta; // Simplified logic
    }
    void Render(IRenderer* renderer) {
        renderer->DrawSprite(x, y, texture);
    }
};
Each class only handles its own responsibilities, and classes are decoupled through interfaces or explicit dependency injection.
2. Separate Interface and Implementation
Use .h and .cpp files to distinguish between the interface and implementation. The interface should be public, stable, and backward-compatible, which facilitates faster compilation and dependency control.
3. Namespace Organization
Use namespace Engine, namespace Game, namespace UI, etc., to prevent symbol pollution and name collisions.
4. Dependency Management and Exposure Control
Avoid mutual inclusion of header files. Use forward declarations or the PIMPL pattern to decouple classes. Modules should only expose the minimum necessary interface. Consider the following code:
C++
// A.h
#include "B.h" // Causes a circular dependency
class A {
    B* b; // A pointer is enough; a full type is not needed
};

// B.h
#include "A.h"
class B {
    A* a;
};

//main.cpp
#include “A.h”
int main(){
    return 0;
}
The Visual Studio 2022 Community Edition compiler will show the following errors in B.h:
error C2143: syntax error: missing ';' before '*' error C4430: missing type specifier - int assumed. Note: C++ does not support default-int error C2238: unexpected token(s) preceding ';'
If you include B.h, the compiler will show the same errors in a.h.
This problem can be solved by using forward declarations, as shown below:
C++
// A.h
class B; // Forward declaration
class A {
    B* b; // OK, because only a pointer/reference is needed
};

// B.h
class A; // Also using a forward declaration
class B {
    A* a;
};
This approach avoids compilation errors and speeds up the build process.
For various reasons, we sometimes need to “hide” implementation details. The PIMPL (Pointer to IMPLementation) pattern can be used for this. PIMPL not only hides details but can also accelerate compilation by reducing dependencies on external header files. Example code:
C++
// GameEngine.h
#pragma once
#include <memory>

class GameEngineImpl; // Forward declaration

class GameEngine {
public:
    GameEngine();
    ~GameEngine();
    void Start();
    void Stop();
private:
    std::unique_ptr<GameEngineImpl> impl; // Holds a pointer to the implementation
};
Users of GameEngine don’t need to be aware of the implementation details. The GameEngine.h header doesn’t expose implementation headers like iostream or GameEngineImpl, so changing the implementation won’t require all dependent files to recompile.
IV. Common Module Division Schemes
UML Class Diagram
1. Core Module
- Logging system
Logger - Time system
GameClock - Configuration loading
ConfigLoader - Event dispatcher
EventBus
2. Foundation Module
- Math library (Vector2D, Matrix4x4)
- Utility classes (StringUtil, FileIO, Timer)
3. Asset Module
- Texture loading
TextureLoader - Audio management
SoundManager - Resource cache
AssetCache
4. GameLogic Module
- Character state machine
StateMachine - Skill system
SkillEngine - AI behavior tree
BehaviorTree
5. Renderer Module
- Renderer interface
IRenderer - Specific implementations
SDLRenderer,VulkanRenderer - Camera system
Camera,Frustum
6. UI System
- UI component tree
UIWidget - Layout system
UILayout - Event handling
UIEvent
7. Input Module
- Input capture
InputHandler - Keyboard, mouse, and gamepad support
- Input mapping
InputActionMap
8. Platform Abstraction
- Windowing system
Window - System API abstraction
SystemAPI - File system
FileSystem
9. Network Module (Optional)
- Communication protocol
Packet - Client state synchronization
NetSync - Command dispatcher
CommandRouter
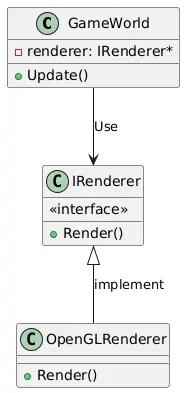
V. Practical Module Dependency Management
- All modules should, as much as possible, depend on interfaces, like
Renderer::IRenderer, rather than concrete classes. - Use an abstract factory registration mechanism to manage module lifecycles.
- Example:
GameLogicdepends onIRenderer*, but is actually injected withSDLRenderer*. - Use CMake for module-based compilation in the build system, controlling dependencies with
target_link_libraries.
Example Code
C++
// IRenderer.h
class IRenderer {
public:
    virtual void Render() = 0;
    virtual ~IRenderer() {}
};

// SDLRenderer.h
#include "IRenderer.h"
class SDLRenderer : public IRenderer {
public:
    void Render() override;
};

// GameWorld.h
class GameWorld {
private:
    IRenderer* renderer;
public:
    GameWorld(IRenderer* r) : renderer(r) {}
    void Update() {
        // Game logic...
        renderer->Render();
    }
};
VI. Project Structure Evolution Examples
Early Structure:
project/ main.cpp player.cpp enemy.cpp utils.cpp
Intermediate Structure:
project/ /core/ /game/ /ui/ /assets/ main.cpp
Mature Structure:
Engine/ Core/ Math/ Renderer/ Input/ Platform/ Game/ Scenes/ Actors/ GameLogic/ Assets/ Models/ Textures/ Sounds/
VII. Benefits of Modularization
- Facilitates unit testing and debugging
- Enhances teamwork, as modules can be developed in parallel
- Strong extensibility: swapping out a renderer or asset system doesn’t require touching business logic
- Improved maintainability: adding new features doesn’t impact old logic
VIII. Notes and Recommendations
- Module organization should be a gradual evolution; it’s not advisable to design a large engine structure from the start.
- Prioritize solving “coupling pain points” before beginning a modular refactor.
- Use CMake to build modules, or modern tools like Bazel.
Example CMake Module Organization
CMake
project(MyGameEngine)
add_subdirectory(Engine/Core)
add_subdirectory(Engine/Renderer)
add_subdirectory(Game)

# Engine/Core/CMakeLists.txt
add_library(Core STATIC Logger.cpp Clock.cpp)
target_include_directories(Core PUBLIC ${CMAKE_CURRENT_SOURCE_DIR})

# Engine/Renderer/CMakeLists.txt
add_library(Renderer STATIC IRenderer.cpp OpenGLRenderer.cpp)
target_link_libraries(Renderer Core)

# Game/CMakeLists.txt
add_executable(Game main.cpp GameWorld.cpp)
target_link_libraries(Game Core Renderer)
IX. Conclusion
The transition from small to large projects is a stage every developer experiences. Mastering the mindset of modularity and practical organization methods will not only help you build stable game projects but also cultivate strong engineering skills.
Modularity is not about “showing off”; it’s about enabling you to iterate on your code consistently, safely, and efficiently. If you are a C++ game developer, I hope this article has provided you with some useful insights.